sweet.
your nearly there now buddy glad it all worked out for you.
i wonder if you will still visit the site once your finished lol.
joey
Lou's Studio - Construction Phase
Moderators: Aaronw, John Sayers
-
doublehelix
- Senior Member
- Posts: 468
- Joined: Sat Apr 28, 2007 10:19 pm
- Location: Indiana
- Contact:
"No treatment required", eh?
I hate you!!!
Haha! Just kidding buddy!
That is so awesome my friend, I am really happy for you. It is really great when it all comes together, and it sounds like it has for you.
Now, it is almost time to have to actually do some recording ya know! That is when "the proof will be in the pudding" as they say. Hopefully, you will be able to get your (old) brain around the Tascams, and things will go smoothly from here on out.
Best to ya Lou!
James
-----------
"Never interrupt your enemy when he is making a mistake."
Napoleon Bonaparte
-----------
"Never interrupt your enemy when he is making a mistake."
Napoleon Bonaparte
-
Lou
- Senior Member
- Posts: 401
- Joined: Thu Dec 28, 2006 1:03 am
- Location: Hampshire, United Kingdom
- Contact:
Hi guys – Here as promised, is the next instalment!
It probably won’t look as if much has happened, but, I can assure you all, I’ve been full on with this since my last update.
First up, get Jeff back, remove one of Archie’s removable panels, take apart some of the workstation, house that Air base 12, and start running some cables! Easy really!

Man what a mess again.

Finally my sub is in its final location. This also shows the steel bracing bars that Jeff used to support the back of the desks. These are of course no more involved than a pair of ‘U’ profile rack strips. Very handy, as you’ll see in a moment.

Get Jeff back up in the void above the control room to run all cables for the surrounds.

Then it’s my turn to get helpful with the soldering iron and sort the 9 XLR connectors that will provide digital and analogue signals to the monitors. This was also a good time to adjust the length of all mains cables, and replace with right angled IEC’s to save space at the back of the soffits. Cat 5's also in final position.

My babies positioned out of harms way, yet looking somewhat frustrated!

A colleague of mine kindly donated this little lot as he is in the throws of a rewire at his place – Nice one Joe and thanks bro!

This is what I salvaged (cable at bottom of pic), together with the extra bits I’ve purchased for the full wire-up.

All cartons are labelled so that I know exactly where each of the 340 connectors is hidden!!!!!

The supporting rack strips under the desks make perfect harnessing points for all cabling, and NO, there isn’t any mains running with audio!


My focusrites are on order, but I did get mains to my CD player, my behringer power distribution racks, the two presonus headphone amps, tuner, and those Mindprints.


Now for the bit we’ve all been waiting for…………….Ok, all the gear so far is ‘mains’d-up’, but no inter-connecting wiring has been done yet as I’m still waiting for my panels. However I can belt a CD out to die for, and I should have all my computer gear and the rest of my existing kit installed by the end of the week. This means that I will effectively be able (at last) to work exactly as I have been doing, but this time in the new facility, with new desks and monitoring.
For the really eagle eyed, you’ll doubtless already know that I now have just two days left before the 18th July, which is exactly one year on from when this whole project started. Full wiring will be done before the end of August, as a Studio launch party is being planned just after that. U.K. builders get yourselves down here and take a gander!
Self-righteous/gratuitous/nerdy chuffed shots of Studio 4 control room as it stands at the moment!!!!!!!

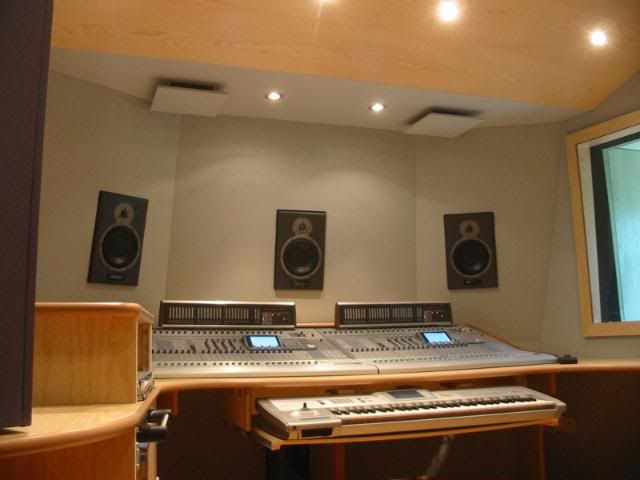
Oh yes!

Off topic close to provide a laugh. Sarah and I were invited to a fancy dress party Saturday night. The theme was Hollywood film characters, Sarah went as……………………..steady DH!

And I went as…………………………………….

That’s it for now chaps more soon. The wiring has already been lonely, two 25 pin D-types to the back of the desks didn’t help! The rest should be easier if not awkward to get to.
Warm regards as always,
Lou.
It probably won’t look as if much has happened, but, I can assure you all, I’ve been full on with this since my last update.
First up, get Jeff back, remove one of Archie’s removable panels, take apart some of the workstation, house that Air base 12, and start running some cables! Easy really!
Man what a mess again.
Finally my sub is in its final location. This also shows the steel bracing bars that Jeff used to support the back of the desks. These are of course no more involved than a pair of ‘U’ profile rack strips. Very handy, as you’ll see in a moment.
Get Jeff back up in the void above the control room to run all cables for the surrounds.
Then it’s my turn to get helpful with the soldering iron and sort the 9 XLR connectors that will provide digital and analogue signals to the monitors. This was also a good time to adjust the length of all mains cables, and replace with right angled IEC’s to save space at the back of the soffits. Cat 5's also in final position.
My babies positioned out of harms way, yet looking somewhat frustrated!
A colleague of mine kindly donated this little lot as he is in the throws of a rewire at his place – Nice one Joe and thanks bro!
This is what I salvaged (cable at bottom of pic), together with the extra bits I’ve purchased for the full wire-up.
All cartons are labelled so that I know exactly where each of the 340 connectors is hidden!!!!!
The supporting rack strips under the desks make perfect harnessing points for all cabling, and NO, there isn’t any mains running with audio!
My focusrites are on order, but I did get mains to my CD player, my behringer power distribution racks, the two presonus headphone amps, tuner, and those Mindprints.
Now for the bit we’ve all been waiting for…………….Ok, all the gear so far is ‘mains’d-up’, but no inter-connecting wiring has been done yet as I’m still waiting for my panels. However I can belt a CD out to die for, and I should have all my computer gear and the rest of my existing kit installed by the end of the week. This means that I will effectively be able (at last) to work exactly as I have been doing, but this time in the new facility, with new desks and monitoring.
For the really eagle eyed, you’ll doubtless already know that I now have just two days left before the 18th July, which is exactly one year on from when this whole project started. Full wiring will be done before the end of August, as a Studio launch party is being planned just after that. U.K. builders get yourselves down here and take a gander!
Self-righteous/gratuitous/nerdy chuffed shots of Studio 4 control room as it stands at the moment!!!!!!!
Oh yes!
Off topic close to provide a laugh. Sarah and I were invited to a fancy dress party Saturday night. The theme was Hollywood film characters, Sarah went as……………………..steady DH!
And I went as…………………………………….
That’s it for now chaps more soon. The wiring has already been lonely, two 25 pin D-types to the back of the desks didn’t help! The rest should be easier if not awkward to get to.
Warm regards as always,
Lou.
-
doublehelix
- Senior Member
- Posts: 468
- Joined: Sat Apr 28, 2007 10:19 pm
- Location: Indiana
- Contact:
WOW!!! WOW!!! WOW!!!
Dude, that is just amazing! I have no words to describe how happy I am for you!
I love the picture of Sarah as Cruella Deville! I am trying not to drool!!! You however make a pretty ugly Clint Eastwood!!! (Just kidding... GREAT costume!)
Dude, that is just amazing! I have no words to describe how happy I am for you!
I love the picture of Sarah as Cruella Deville! I am trying not to drool!!! You however make a pretty ugly Clint Eastwood!!! (Just kidding... GREAT costume!)
James
-----------
"Never interrupt your enemy when he is making a mistake."
Napoleon Bonaparte
-----------
"Never interrupt your enemy when he is making a mistake."
Napoleon Bonaparte
-
Ensonix Studios
- Posts: 91
- Joined: Wed Jun 13, 2007 6:05 am
- Location: Miami, Florida, USA
-
reido113
- Posts: 1
- Joined: Sun Jul 20, 2008 12:21 am
- Location: Houston, TX.
- Contact:
-
gareth.h.rees
- Posts: 83
- Joined: Sat Feb 03, 2007 12:08 pm
- Location: Wales, UK
Wow Lou!!
I've been quietly keeping up to date with this diary and well - I'm speechless! It looks (and appears to sound!) flawless! Can't wait to see it completely finished - bet you feel the same.
Also loving your shots of corfu - I'm heading there with some friends at the end of August myself, so hopefuly I'll have the same sunsets as you:D
Enjoy the rest of your build
Gareth
-
Ro
- Senior Member
- Posts: 2073
- Joined: Sat Mar 29, 2003 12:26 am
- Location: Netherlands
- Contact:
-
Lou
- Senior Member
- Posts: 401
- Joined: Thu Dec 28, 2006 1:03 am
- Location: Hampshire, United Kingdom
- Contact:
Hi guys – As always, many thanks for the kind words of encouragement, really appreciated.
Ok well here’s the next bit. A step by step guide on how to produce a set of ridiculously ‘over-specified’ wall panels! I mean the kind of panels that make you want to say “What on earth made you go for that many connections? Are you mad? You’ll never use that lot in a million years.”
Well at least that saves you guys the trouble!
Anyway – Here goes.
Firstly, make a detailed .skp of your panel and ensure that you’ve thought of everything you need and may need one day in the future.

Then ask a very experienced dude up here if they will kindly convert the files to .dwg files so that your mate’s works laser cutter can read them.
You know who you are kind Sir, so thank you very much once again.
Next, have a mock-up made in really cheap galvanised steel, so that you can check all the holes are in the correct position, and of the right diameter. They are!

Then gather together all connectors and do a final check of stock.

Once happy, give your mate’s firm the go-ahead to produce all four panels.

Marvel at the ‘nerdy’ beauty of 2.5mm brushed and lacquered mild steel, and then hit yourself around the head as you suddenly realise that 4 of the connector holes in the bottom panel (second row up) don’t have the diagonal fixing holes! Yes Lou – You must have deleted those from that .skp by accident and you’ll now have to drill those yourself!
Assemble the necessary tools, and in particular, make sure you have a 5.5mm ‘nut spinner’.

Then set up an assembly line.

Break yourself in gently by making up the smallest panel first. This one is for the front lobby, for those situations where a drummer and bass player want to hear a guide vocal whilst they’re laying down their parts.

Then steam into it and make up the big live room panel.

Complete the other two, and sigh in disbelief as you find out you’ve under-ordered by 4!

Take front view photo for forum.
Top to bottom is live room, iso-booth, and chill-out area. Yes good people, there will be tie-lines to the conservatory as the acoustics in there are terrific. Ideal for a live sounding recording of a string quartet perhaps, maybe even with the doors open so that you could hear the birds and the trees in the background!

Return panels to live room for safe keeping.

Take a couple of detail shots to close the post.

The logo and all the labelling have been etched by laser into the steel prior to brushing and lacquering. The speakons are for when a player wants his amp in the control room but his cab in the live room, and the GTR1 and 2 sockets are cable glands that will house decent guitar leads. These will be simply coiled up and placed on hooks either side of the walls. Basically a guitarist can plug into one end of a good quality guitar lead in the control room, and the other end will plug into his gear in either the live room or iso-booth.
Admit that you’ve gone way ‘over the top’ and hope that at least a few forum members agree that you’ve covered just about every eventuality, and …………………well, you know!

Next up is the woodwork and steel angle to house and mount said panels, and then I won’t be able to put off the main wiring any longer.
More soon dudes,
Regards as always,
Lou.
Ok well here’s the next bit. A step by step guide on how to produce a set of ridiculously ‘over-specified’ wall panels! I mean the kind of panels that make you want to say “What on earth made you go for that many connections? Are you mad? You’ll never use that lot in a million years.”
Well at least that saves you guys the trouble!
Anyway – Here goes.
Firstly, make a detailed .skp of your panel and ensure that you’ve thought of everything you need and may need one day in the future.
Then ask a very experienced dude up here if they will kindly convert the files to .dwg files so that your mate’s works laser cutter can read them.
You know who you are kind Sir, so thank you very much once again.
Next, have a mock-up made in really cheap galvanised steel, so that you can check all the holes are in the correct position, and of the right diameter. They are!
Then gather together all connectors and do a final check of stock.
Once happy, give your mate’s firm the go-ahead to produce all four panels.
Marvel at the ‘nerdy’ beauty of 2.5mm brushed and lacquered mild steel, and then hit yourself around the head as you suddenly realise that 4 of the connector holes in the bottom panel (second row up) don’t have the diagonal fixing holes! Yes Lou – You must have deleted those from that .skp by accident and you’ll now have to drill those yourself!
Assemble the necessary tools, and in particular, make sure you have a 5.5mm ‘nut spinner’.
Then set up an assembly line.
Break yourself in gently by making up the smallest panel first. This one is for the front lobby, for those situations where a drummer and bass player want to hear a guide vocal whilst they’re laying down their parts.
Then steam into it and make up the big live room panel.
Complete the other two, and sigh in disbelief as you find out you’ve under-ordered by 4!
Take front view photo for forum.
Top to bottom is live room, iso-booth, and chill-out area. Yes good people, there will be tie-lines to the conservatory as the acoustics in there are terrific. Ideal for a live sounding recording of a string quartet perhaps, maybe even with the doors open so that you could hear the birds and the trees in the background!
Return panels to live room for safe keeping.
Take a couple of detail shots to close the post.
The logo and all the labelling have been etched by laser into the steel prior to brushing and lacquering. The speakons are for when a player wants his amp in the control room but his cab in the live room, and the GTR1 and 2 sockets are cable glands that will house decent guitar leads. These will be simply coiled up and placed on hooks either side of the walls. Basically a guitarist can plug into one end of a good quality guitar lead in the control room, and the other end will plug into his gear in either the live room or iso-booth.
Admit that you’ve gone way ‘over the top’ and hope that at least a few forum members agree that you’ve covered just about every eventuality, and …………………well, you know!
Next up is the woodwork and steel angle to house and mount said panels, and then I won’t be able to put off the main wiring any longer.
More soon dudes,
Regards as always,
Lou.
-
gareth.h.rees
- Posts: 83
- Joined: Sat Feb 03, 2007 12:08 pm
- Location: Wales, UK
Lou you're crazy! 
I LOVE the embedded logo - very professional touch!
I'm just going to use an off the shelf stagebox/multicore
With those guitar lines - how long will the cable be between the connections? I'm thinking of doing the same but am a little concerned about the distance degrading the signal too much.
Cheers
Fantastic work!
Gareth
-
doublehelix
- Senior Member
- Posts: 468
- Joined: Sat Apr 28, 2007 10:19 pm
- Location: Indiana
- Contact:
Nice looking panels Lou! I love the way you etched your logo into them. Pretty amazing, as usual. I guess we are coming to expect nothing less than perfection from you amigo!
I did the same thing in that I went a bit overboard on my panels as well knowing that you can never have too much!
I have 32 mic jacks wired in various spots around the studio (live room, iso room, air lock), lots of guitar instrument cables running into every location, ethernet (headphones), 12 ga. speaker cable (a bitch to solder), MIDI, etc.
I also make my mic jacks using the Neutrik combo jacks on the live room side so I can plug in either mic XLR cables or TRS 1/4" plugs.
James
-----------
"Never interrupt your enemy when he is making a mistake."
Napoleon Bonaparte
-----------
"Never interrupt your enemy when he is making a mistake."
Napoleon Bonaparte